Thursday 25 August 2011

book week 2011

may i present - triple j as astronaut piggy wiggy.....

taken this morning before she headed off to school!!
book week can be a real bugger for parents of smaller kids.
what book to pick?? - what to wear?? - how much is it all going to cost???
are there going to be a million princesses and 2 million harry potters????? (yes - i spied a few at drop offs this morning!!!)
and book week always falls in winter here - so skimpy outfits are a no go as they freeze their butts off!!!!

at triple j's school, book week to a huge deal - it has been ever since the school opened in 2002 (the year triple j was born - and goob was in year 1)
they've always had great librarians at the school and all the staff get into the dress-ups - so it is a great event for everyone. 
but - yes - it can be stressful on a household that is already super duper busy.

this year triple j chose to recycle an outfit which eky thought of and wore last year (yay says me!!) - based on the book astronaut piggy wiggy by christyan and diane fox - here's a link to the book on amazon.....


we have a well stocked dress-up trunk that has been added to many times over the years.
i've made some outfits - and some have been store bought.

this year's outfit is a mix of a store bought piggy outfit (picked up cheap about 5 years ago from spartys - the party shop which is part of spotlight) - teamed with a costume i put together 5-6 years ago for goob for a project presentation on neil armstrong.

for the astronaut outfit - i picked up a cheap disposable all-in-one painting suit from bunnings and i internet searched, printed out and stuck on logos from nasa/u.s. flag/apollo one mission - and printed off an armstrong name tag. (yep - they're all paper stuck on with glue!!)
and - it's lasted this long!!!!

triple j is actually wearing the pig suit under the astronaut suit - so we cut a small hole so that the important piggy tail could stick through.....


we teamed the outfit with a cheap plastic fish bowl - for an astronaut's helmet.....(this has never been a fish bowl - it lives in our dress up trunk)....it's all about the accessories!!!.....


here are the astronaut badges.....(a little crumpled - as i said - this has had 5-6 years of wear!! - but they've stayed on).....


and here's her piggy wiggy head.....


all kids had to bring along a bag with the book cover on the outside - inside they had to have 5-6 items which represented the book.....


not super flash (as far as outfits go) - but triple j was so excited in her outfit this morning - and ultimately that's all that mattered.
can i also say - that years of dress-ups have paid off.
we have a great stash now and my girls now work together on outfits (it helps now that my oldest is 15!) they try to find things that we already have before we have to go out and buy anything new.


triple j has 3 more years left at primary school - i wonder what she'll be wearing next year?!?!?!
(it would probably help if we didn't always leave the costume picking to the last minute!!)

apologies for the lack of posts of late.
semester 2 at uni has just started back - and i've had goob and eky home all week - really sick with bad coughs.
let's hope the warmer spring weather stays - and all lurgies leave this house for good. (oh - all fingers and toes are crossed!!)

hope things are well in your part of the world.
hugz from here.
cheryl xox.

Thursday 18 August 2011

goob's room - gallery wall details (1 of 2 posts)

thanks for all the lovely comments on goob's gallery wall.


here's the details on the wall as promised - for those that might be interested.

i've broken the wall into two parts - this post is about the top section -


item # 1


this frame was originally a very cheap black vinyl covered frame with glass - no matt.


the keys - i've had a bunch of old keys for a long time (you can pick them up on ebay etc) - goob requested to have some on her wall - i'm a nice mum - so i said ok!!!

method
1. remove glass from frame (i left this frame finished with no glass)
2. glue fabric (or paper) to the sturdy piece of card (the same size as the piece of paper that comes inside the frame) & allow to dry.
3. arrange keys on fabric - then pierce small hols with a sharp knife either side of the key - and thread thin wire to hold the key in place - twisting at the rear to keep firm.

here is a closeup - you can just see the black thin wire i used.....


i then rubbed and buffed on silver leaf over the frame (i've posted about using this before here) ......

when dry - i put the frame back together - minus the glass - and hung on wall.

item # 2

the classic button letter!!
the best tutorial i found on this technique is here - i found it to be very easy to follow and clear.

i just used Microsoft Word to work out the font and size of the letter i wanted - then made the letter showing just the outline (to save on ink) - printed it out on paper then carefully cut it out.

here are some pics of the process.....
playing around with button placement - then moving to a clear locaation to start the gluing
started on one section on the g - then just kept adding layers and glued as i went
once on the wall - you don't even notice that there is a letter cutout underneath the buttons - but it does help to define the letter better. i like it!!!

i also left the glass off this frame due to the height of the buttons.
i used the glue cun to attached the blue paper to some card before putting it in the frame.

item # 3

this one was a former gift from a friend to goob many years before - and it looked like this.....

 method
1. 'gems' removed
2. painted on sides and edges with black paint.
3. painted on sides and edges with white paint.
4. paper was stuck to the top of the letter with mod podge.
5. light sanding along edges with fine sandpaper (including along the edge of the paper).
6. glaze and brown paint mix painted over top and sides - and wiped off gently with tissue. (just to age the finish a little)
7. 3 x coats of matte varnish added to finish it off.


item # 4


that's us - the nefotlak family!!!

essentially this was a cheap brown laminated frame rubbed over with that magic silver leaf i mentioned above (for item # 1). love love love that stuff!!

here's a close up of us.....(photo taken at a 50th b'day bash we attended last year).....


item # 5


this is the pictrue/frame that started this whole gallery wall.
this used to always be on this wall - all by itself and lonely!!

it is an original lithograph which was given to goob for her christening in 1996 - framed and all - i have not touched this frame - it's exactly how it was received!!!

the artist.....i believe is an australian - although i know nothing about her.....

the picture i find kind of odd - but i think it's a very clever christening present (instead of all the trinkets one mostly gets) - as it's far more useful into goob's older years than most of her other gifts!
she's got some real art!!!

anyhoo that's my thoughts.


so that's the gallery wall tour for now - i will be back to share the nitty-gritty about the lower half soon - i promise.

yay - tomorrow is friday!!! sweeet!!!!
hugz,
cheryl xox. 

Tuesday 16 August 2011

goob's room - gallery wall reveal

finally i can reveal the gallery wall in goob's room makeover. (all posts related to this room makeover can be found here).

here's a look up the wall.....


it's taken awhile - as i've been rather fussy with the lay out, the frames and the content.

everyone sees this wall when they return from a visit to our laundry and/or main bathroom and toilet.
(as our girls usually keep their doors open during the day)
i see this wall many many times every. single. day.

so i just had to keep tweeking it!! (i like that word 'tweek' - it makes my ocd-ness sound ok!!)

happily i can now say i'm done with the tweaking - and really happy with the results.

here's the view as you walk out from the laundry/bathroom area to the loungeroom.....(you then take a right turn after you see this wall!!!.......just in case you're ever over at my place and want to know your way around!!!!).....

i've posted about some of the pictures on the wall - but i'll add more details over the coming days for anyone that is interested.

after i started to get some of the frames together - i set it out on the floor to get an idea of how it might look......


i then started to change things around - upgrade some frame finishes - generally tweek it!! (is that too much use of the word now?!?!?!)

here's a closer look at the top half of frames....


and here's the bottom half.....


at the base of the wall we've placed the little storage ottoman i posted about here.....


i'll be back tomorrow with some details about the frames if anyone is interested.

it really is nice to see this room transform slowly (although at times i wish it could happen faster). but we are making steady progress - and we're really really liking where it's heading.

oh - and the room is still only painted in undercoat!!!! (and i still haven't touched the trim or the doors - eek!) the white is really growing on us all - i can see it happening to most of the rooms in the house if i get my way!!!

back at uni this week for me - another semester - let's hope it's a good one!

hope you're having a great week.

hugz,
cheryl xox.

linky up at some wonderful places.....


The DIY Show Off


UndertheTableandDreaming


The Lettered Cottage

Saturday 13 August 2011

goob's room - styled bookcase reveal

finally. apologies for the wait. we were waiting on a pig to dry!!!
today i can show you goob's bookcase all set up - finished and done!
(all posts regarding goob's room makeover can be found here)

the upgrade of the actual bookcase with the fabric backing can be found here.
there are lots of pics ahead!
here's the final reveal......


we're so very very happy with how it's all turned out.
ahead is a break down of bits and pieces on each shelf - just for anyone that is interested - and i felt like taking lots of pics!
this is the first time i've really tried to 'style' a bookcase. it may not be professional - but we're really liking it this way. (and goob really wants to keep it neat and tidy like this - so hopefully that's an ongoing commitment into the future....we can live in hope!!)

here goes with the pics.....here is the first shelf.....

.....and this is the pig in question that was causing all the delays.....


.....because until i got to him with white spray paint - he used to look like below..... (i covered his eyes and nose with tape for the spraying - as goob wanted to keep that feature!!).....


then we have this storage jar - makeover posted about here - which now stores the nail polish bottles.....


then we have this precious g box - which i painstakingly decorated for goob's first christmas - and now holds her birth hospital band and a few other little keepsake bits and pieces!! (i had so much time and patience back in 1996!!) .....


dozens and dozens of g letters cut out from many many magazines - stuck on - then covered in many many coats of matt varnish.....


next we have shelf # two.....

first up we have a cute little sugar bowl and lid (cheap from spotlight) - with an added handmade tissue/napkin flower i made from this great tutorial.....


next we have the teddy cross-stitch i made when pregnant with goob - frame updated recently - check out the post here.....


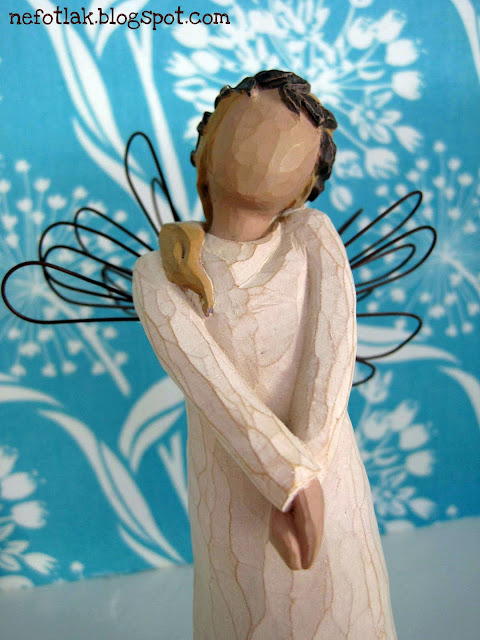
 and here's the little angel standing in front of that frame.....she's a willow tree hand carved angel by susan lordi.....a christmas gift to goob from mr w. and i a few years ago.....if interested you can see more on this website.....


and lastly on that shelf we have a rock figure that goob made when she was little - a dog stuffed toy that was mine as a baby - and a bunny from her oma (grand-mother) when she was born.....


next shelf.....# 3 - mostly used for school bits and pieces (the left spot is where she puts her laptop when not in use.......


we have another of my faux cloche/glass domes - which i have posted about here.....($4.00 glass hurricane lantern from sam's warehouse turned upside down - nifty & thrifty!!).....


.....where we have on display a small ceramic owl perched on an upside-down tea light candle...its a height thing!!.....(posted about here) - a star metal cookie cutter at the rear - and up front a metal star i pulled off a tablecloth weight clip that i never use (it's being helped to stand up with a little blu-tac!! - can you spot it??).....


and we have some cheapo magazine boxes from office works (only $1.59 last week!) to hide some of the less attractive stuff - i put them together backwards (ie inside-out).....


.....and added some cardboard numbered tags with some string for fun..... i cut out two different sizes of circles (large in red/small in white) - used a stencil to draw on the numbers - punched in some holes - and strung those babies in place!!......happy to write up a tutorial on this one if any one would like.....


the second last shelf.....


i was thinking that the little pops of red were a good thing - so grabbed these little coffee cups at spotlight (small $2.99 / large $3.99).....


and finally the last shelf.....


and we're done!!!

here's a little progression of where we've come from until today.....

i thought ever-so-briefly about covering some books in white paper - but this is essentially a teenagers room - so i slapped myself and gave myself a stern talking to!! the bookcase is only viewed if you come into her room and turn around - i'm thinking it's looking nice and 'pretty' enough for this space.

plus goob loves it - and that's ultimately all that matters.

here's the final reveal once more....


hope you enjoyed this photo tour!
i'd better now get back to finishing other parts of her room. (i really need to finish the little gallery wall....and get going on sewing some cushions.......)

hope you're having a great weekend.
cheryl xox.

during the week i'm going to be linking up to these lovely blogs......please pop over if you get the chance - awesome blogs and great link parties.....


The DIY Show Off


UndertheTableandDreaming
Related Posts Plugin for WordPress, Blogger...