over the last few months we have finally moved forward in the dining room. it's not finished - but we've made huge progress.
today - I reveal that it looks like this....
it used to look like this....(circa 2005)....
...and for a little while it looked like this....(much of 2010!)....
...yes - a very scrappy mess - piled high with the contents of our study while that room was being painted and upgraded....and no - the study is still not complete either!!!....yes - that's how we roll!!!
we painted - the same as the lounge room (as these rooms are connected) - removing the blue feature wall (yay!) - and we pulled up the carpet (it's currently raw concrete - this will be painted - possibly white) and lay down a rug.
nice change - yes?!?!
I love to walk past this room now (which happens a zillion times a day as it's the main access way between the front door/main bedroom/study to the rest of the house.
the white dots around the edges are putty patches where we pulled up the nail bits that held down the carpet. there was also a lot of glue bits to sand back from the undelay. we'd love to keep it raw concrete - but it's not in great shape - and finishing it by sanding and sealing is just too expenisve and dusty - so we'll paint. (we'd ultimatley love a wood floor - but as finances don't allow for such now - we'll get by how we can - at least the blue carpet has gone - yay!!! - well in half the room at least - you'll see what I mean in the following photos.....!)
here's some more pics.....
and here's the view back to the loungeroom......
and here's the loungeroom today.....(yes I've been playing around with the layout once more - it's an unusual room and difficult to fit it all in with a baby-grand piano - peeking at the left)....
....see - the blue carpet still exists on that side of the room!!!!!
ah - this home reno stuff is mighty slow when you have 3 children, work, uni, sport - life!!!!!
but today - I'm feeling really good at the progress we've made so far.....
hopes and dreams.......white linen slip covers for the dining chairs, new window coverings (perhaps a roman shade), some art and pictures, some kind of pendant light over the table, some larger base boards (they're tiny in the entire house) and of course the painted floor.
love this painted wood floor I found this morning on houzz (and I now have it pinned on pinterest!!)....
we'll see how adventurous I get. perhaps we'll start with white and see how we go from there!!!
will post photos when we tackle some more.
hope all is well in your world.
loads of hugz from here.
cheryl xox.
Showing posts with label our house. Show all posts
Wednesday, 15 February 2012
Wednesday, 12 October 2011
main bedroom - sneak peek
We spent our first night back in our own bed last night - * bliss * - after bed hopping between the kids beds and the lounges for 3 nights.
We do have a pull out sofa bed in the office, but that was just all too much work!!!
After 3 coats of undercoat and 2 coats of topcoat - here's a little look at how our main bedroom looks this morning.....
ahhhh - so nice!!!
That is just fabric folded over our duna/quilt at the end of the bed. I've had the fabric for a very very long time - waiting for the right moment to come out and show itself!
It will be made into a duna cover sometime this week.
I love how it looks in the room - and thankfully mr w. loves it too. (I was worried he might think it a little too girly - but no - he thinks it all looks great - nice!)
There will also be 2 pillow covers made out of the same fabric - and a long scatter cushion (similar style to the one made for goob here) made out of my huge stash of red fabrics.
On the other side of the room - we have a cabinet that needs painting - and eventually we'll get a comfortable chair.
I need to work on some curtains - and some artwork - painting various picture frames - it's all moving forward slowly but surely.
mr w. is the main room painter (job well done!) - while I work on all the other bits and pieces. Great teamwork really!!
We're absolutely loving the open and airy feel of our new room! (We've been in this house since 2003 - but the room feels bright and new now!)
Ultimately - new carpet would also be our dream - but that's way off the cards for now - so dreary blue it must stay.
Here's a quick before and after -
Posts may be a little slow around here for awhile. I know - sad - I'll miss you all too!!
I have loads of uni work I really need to sink my teeth into - plus I go on 3 weeks prac in a local primary school next week.
Wish me luck.
This time next year I should be all completed and be a real life qualified teacher!
Hugz from here.
cheryl xox.
Linking here.....


We do have a pull out sofa bed in the office, but that was just all too much work!!!
After 3 coats of undercoat and 2 coats of topcoat - here's a little look at how our main bedroom looks this morning.....
ahhhh - so nice!!!
That is just fabric folded over our duna/quilt at the end of the bed. I've had the fabric for a very very long time - waiting for the right moment to come out and show itself!
It will be made into a duna cover sometime this week.
I love how it looks in the room - and thankfully mr w. loves it too. (I was worried he might think it a little too girly - but no - he thinks it all looks great - nice!)
There will also be 2 pillow covers made out of the same fabric - and a long scatter cushion (similar style to the one made for goob here) made out of my huge stash of red fabrics.
On the other side of the room - we have a cabinet that needs painting - and eventually we'll get a comfortable chair.
I need to work on some curtains - and some artwork - painting various picture frames - it's all moving forward slowly but surely.
mr w. is the main room painter (job well done!) - while I work on all the other bits and pieces. Great teamwork really!!
We're absolutely loving the open and airy feel of our new room! (We've been in this house since 2003 - but the room feels bright and new now!)
Ultimately - new carpet would also be our dream - but that's way off the cards for now - so dreary blue it must stay.
Here's a quick before and after -
Posts may be a little slow around here for awhile. I know - sad - I'll miss you all too!!
I have loads of uni work I really need to sink my teeth into - plus I go on 3 weeks prac in a local primary school next week.
Wish me luck.
This time next year I should be all completed and be a real life qualified teacher!
Hugz from here.
cheryl xox.
Linking here.....


Saturday, 10 September 2011
goob's room - upcycled door to mirror
as mentioned in yesterday's post - i'm back today to reveal some more progress on goob's room makeover.
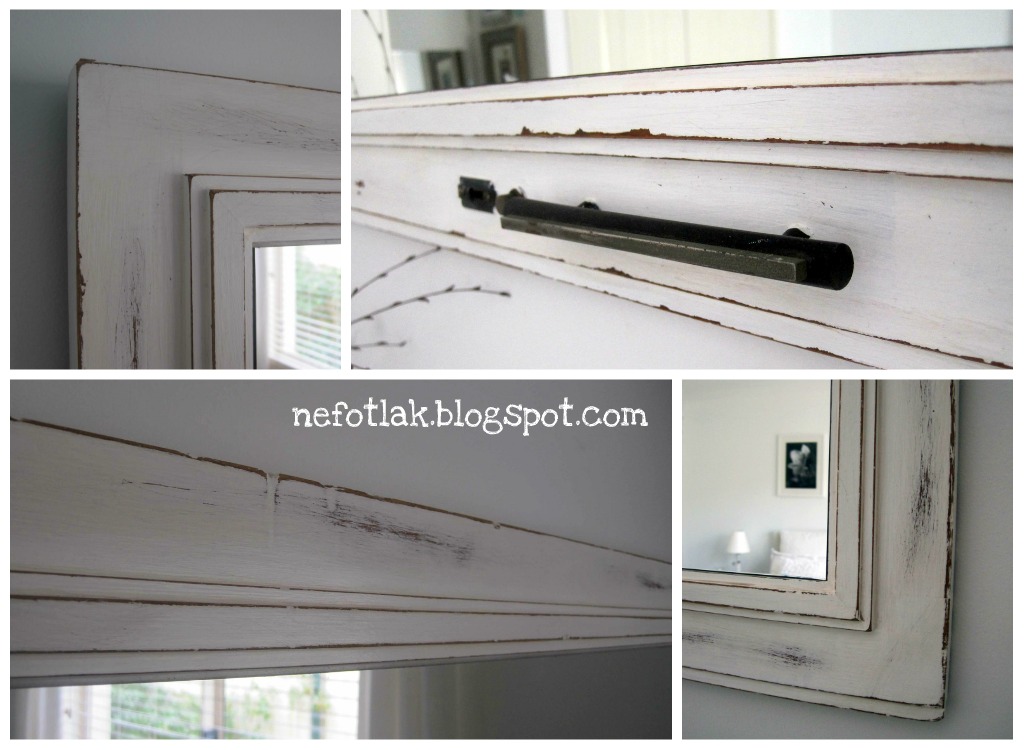
today's post is about an upcycled cabinet door - which has been turned into a wall mirror.....
it used to look like this.....
fyi - the cabinet this belonged to is in our bedroom. (we got it for free when we did a cabinet swap with our neighbours!!) under the doors lay loads of flush fit big heavy drawers. it was super frustrating to open the doors and then open the drawers to get to things - so one morning i declared that they had to come off!! the whole cabinet will be re-painted when we get a chance to get to our bedroom! and the other door may be upcycled to a chalkboard in the very near future.
no progress photos of the following process (bad blogger i know...) - but here's my method -
- after wiping down (no sanding - i'm too lazy!!) - i painted on 2 coats of zinsser bulls eye 1-2-3 (undercoat/primer-sealer/stain killer) - love this stuff - and 2 coats of dulux aquanamel semi gloss fair bianca half strength. (both were bought from bunnings)
- i then sanded it back heavily in spots with our nifty hand sander - and painted on/wiped off a little glaze i made with jo sonja's clear glaze medium & semco acrylic paint in burnt umber. (both bought from spotlight)
- we left all the hardware on the door - 'cuz it reminds us of it's former use - and it looks kinda funky!!!
- we then measured up and got a mirror cut to size from a local glass merchant (after getting about 5 quotes from various places) - then attached the mirror in with heavy duty double sided tape. (mirror cost $50 - which was a bit of a bugger - but it fits perfectly & is covered in a special film on the back which means it won't shatter in a million sharp bits if something bad were to happen)
- on the back of the frame - we added some heavy duty sawtooth frame hangers (see here for what they look like - these aren't the exact brand we used - but ask for sawtooth frame hangers at bunnings and they'll lead you to them!) - and using a spirit level - hung the whole thing up on some hooks.
note: it's not in the exact right spot on the wall - it's level but we didn't centre it as much as i would have liked - when i get around to it - i might fix it up!!
here's lots of pics.....
this mirror not only reflects loads of light around the room - it also allows goob to have a place to do her hair and makeup - so that she's not taking over the bathroom. (3 girls must share 1 bathroom - and at times it can get pretty crowded in that space!!!)
here's a before and after pic for one last reminder......
and here's one more last pic - 'cuz i can.....
i'll be back tomorrow to post about that jar hanging thingy up there!!
hope you're having a great weekend.
cheryl xox.
today's post is about an upcycled cabinet door - which has been turned into a wall mirror.....
it used to look like this.....
fyi - the cabinet this belonged to is in our bedroom. (we got it for free when we did a cabinet swap with our neighbours!!) under the doors lay loads of flush fit big heavy drawers. it was super frustrating to open the doors and then open the drawers to get to things - so one morning i declared that they had to come off!! the whole cabinet will be re-painted when we get a chance to get to our bedroom! and the other door may be upcycled to a chalkboard in the very near future.
no progress photos of the following process (bad blogger i know...) - but here's my method -
- after wiping down (no sanding - i'm too lazy!!) - i painted on 2 coats of zinsser bulls eye 1-2-3 (undercoat/primer-sealer/stain killer) - love this stuff - and 2 coats of dulux aquanamel semi gloss fair bianca half strength. (both were bought from bunnings)
- i then sanded it back heavily in spots with our nifty hand sander - and painted on/wiped off a little glaze i made with jo sonja's clear glaze medium & semco acrylic paint in burnt umber. (both bought from spotlight)
- we left all the hardware on the door - 'cuz it reminds us of it's former use - and it looks kinda funky!!!
- we then measured up and got a mirror cut to size from a local glass merchant (after getting about 5 quotes from various places) - then attached the mirror in with heavy duty double sided tape. (mirror cost $50 - which was a bit of a bugger - but it fits perfectly & is covered in a special film on the back which means it won't shatter in a million sharp bits if something bad were to happen)
- on the back of the frame - we added some heavy duty sawtooth frame hangers (see here for what they look like - these aren't the exact brand we used - but ask for sawtooth frame hangers at bunnings and they'll lead you to them!) - and using a spirit level - hung the whole thing up on some hooks.
note: it's not in the exact right spot on the wall - it's level but we didn't centre it as much as i would have liked - when i get around to it - i might fix it up!!
here's lots of pics.....
![]() |
| tissue paper flowers posted about here |
this mirror not only reflects loads of light around the room - it also allows goob to have a place to do her hair and makeup - so that she's not taking over the bathroom. (3 girls must share 1 bathroom - and at times it can get pretty crowded in that space!!!)
here's a before and after pic for one last reminder......
and here's one more last pic - 'cuz i can.....
i'll be back tomorrow to post about that jar hanging thingy up there!!
hope you're having a great weekend.
cheryl xox.
Thursday, 18 August 2011
goob's room - gallery wall details (1 of 2 posts)
thanks for all the lovely comments on goob's gallery wall.
here's the details on the wall as promised - for those that might be interested.
i've broken the wall into two parts - this post is about the top section -
item # 1
this frame was originally a very cheap black vinyl covered frame with glass - no matt.
the keys - i've had a bunch of old keys for a long time (you can pick them up on ebay etc) - goob requested to have some on her wall - i'm a nice mum - so i said ok!!!
method
1. remove glass from frame (i left this frame finished with no glass)
2. glue fabric (or paper) to the sturdy piece of card (the same size as the piece of paper that comes inside the frame) & allow to dry.
3. arrange keys on fabric - then pierce small hols with a sharp knife either side of the key - and thread thin wire to hold the key in place - twisting at the rear to keep firm.
here is a closeup - you can just see the black thin wire i used.....
i then rubbed and buffed on silver leaf over the frame (i've posted about using this before here) ......
item # 2
the best tutorial i found on this technique is here - i found it to be very easy to follow and clear.
i just used Microsoft Word to work out the font and size of the letter i wanted - then made the letter showing just the outline (to save on ink) - printed it out on paper then carefully cut it out.
here are some pics of the process.....
![]() |
| playing around with button placement - then moving to a clear locaation to start the gluing |
![]() |
| started on one section on the g - then just kept adding layers and glued as i went |
i also left the glass off this frame due to the height of the buttons.
i used the glue cun to attached the blue paper to some card before putting it in the frame.
item # 3
this one was a former gift from a friend to goob many years before - and it looked like this.....
method
1. 'gems' removed
2. painted on sides and edges with black paint.
3. painted on sides and edges with white paint.
4. paper was stuck to the top of the letter with mod podge.
5. light sanding along edges with fine sandpaper (including along the edge of the paper).
6. glaze and brown paint mix painted over top and sides - and wiped off gently with tissue. (just to age the finish a little)
7. 3 x coats of matte varnish added to finish it off.
item # 4
that's us - the nefotlak family!!!
essentially this was a cheap brown laminated frame rubbed over with that magic silver leaf i mentioned above (for item # 1). love love love that stuff!!
here's a close up of us.....(photo taken at a 50th b'day bash we attended last year).....
item # 5
this is the pictrue/frame that started this whole gallery wall.
this used to always be on this wall - all by itself and lonely!!
it is an original lithograph which was given to goob for her christening in 1996 - framed and all - i have not touched this frame - it's exactly how it was received!!!
the artist.....i believe is an australian - although i know nothing about her.....
the picture i find kind of odd - but i think it's a very clever christening present (instead of all the trinkets one mostly gets) - as it's far more useful into goob's older years than most of her other gifts!
she's got some real art!!!
anyhoo that's my thoughts.
so that's the gallery wall tour for now - i will be back to share the nitty-gritty about the lower half soon - i promise.
yay - tomorrow is friday!!! sweeet!!!!
hugz,
cheryl xox.
Tuesday, 16 August 2011
goob's room - gallery wall reveal
finally i can reveal the gallery wall in goob's room makeover. (all posts related to this room makeover can be found here).
here's a look up the wall.....
it's taken awhile - as i've been rather fussy with the lay out, the frames and the content.
everyone sees this wall when they return from a visit to our laundry and/or main bathroom and toilet.
(as our girls usually keep their doors open during the day)
i see this wall many many times every. single. day.
so i just had to keep tweeking it!! (i like that word 'tweek' - it makes my ocd-ness sound ok!!)
happily i can now say i'm done with the tweaking - and really happy with the results.
here's the view as you walk out from the laundry/bathroom area to the loungeroom.....(you then take a right turn after you see this wall!!!.......just in case you're ever over at my place and want to know your way around!!!!).....
i've posted about some of the pictures on the wall - but i'll add more details over the coming days for anyone that is interested.
after i started to get some of the frames together - i set it out on the floor to get an idea of how it might look......
i then started to change things around - upgrade some frame finishes - generally tweek it!! (is that too much use of the word now?!?!?!)
here's a closer look at the top half of frames....
and here's the bottom half.....
at the base of the wall we've placed the little storage ottoman i posted about here.....
i'll be back tomorrow with some details about the frames if anyone is interested.
it really is nice to see this room transform slowly (although at times i wish it could happen faster). but we are making steady progress - and we're really really liking where it's heading.
oh - and the room is still only painted in undercoat!!!! (and i still haven't touched the trim or the doors - eek!) the white is really growing on us all - i can see it happening to most of the rooms in the house if i get my way!!!
back at uni this week for me - another semester - let's hope it's a good one!
hope you're having a great week.
hugz,
cheryl xox.
linky up at some wonderful places.....


here's a look up the wall.....
it's taken awhile - as i've been rather fussy with the lay out, the frames and the content.
everyone sees this wall when they return from a visit to our laundry and/or main bathroom and toilet.
(as our girls usually keep their doors open during the day)
i see this wall many many times every. single. day.
so i just had to keep tweeking it!! (i like that word 'tweek' - it makes my ocd-ness sound ok!!)
happily i can now say i'm done with the tweaking - and really happy with the results.
here's the view as you walk out from the laundry/bathroom area to the loungeroom.....(you then take a right turn after you see this wall!!!.......just in case you're ever over at my place and want to know your way around!!!!).....
i've posted about some of the pictures on the wall - but i'll add more details over the coming days for anyone that is interested.
after i started to get some of the frames together - i set it out on the floor to get an idea of how it might look......
i then started to change things around - upgrade some frame finishes - generally tweek it!! (is that too much use of the word now?!?!?!)
here's a closer look at the top half of frames....
and here's the bottom half.....
at the base of the wall we've placed the little storage ottoman i posted about here.....
i'll be back tomorrow with some details about the frames if anyone is interested.
it really is nice to see this room transform slowly (although at times i wish it could happen faster). but we are making steady progress - and we're really really liking where it's heading.
oh - and the room is still only painted in undercoat!!!! (and i still haven't touched the trim or the doors - eek!) the white is really growing on us all - i can see it happening to most of the rooms in the house if i get my way!!!
back at uni this week for me - another semester - let's hope it's a good one!
hope you're having a great week.
hugz,
cheryl xox.
linky up at some wonderful places.....


Subscribe to:
Posts (Atom)