Saturday, 10 September 2011

goob's room - upcycled door to mirror

as mentioned in yesterday's post - i'm back today to reveal some more progress on goob's room makeover.

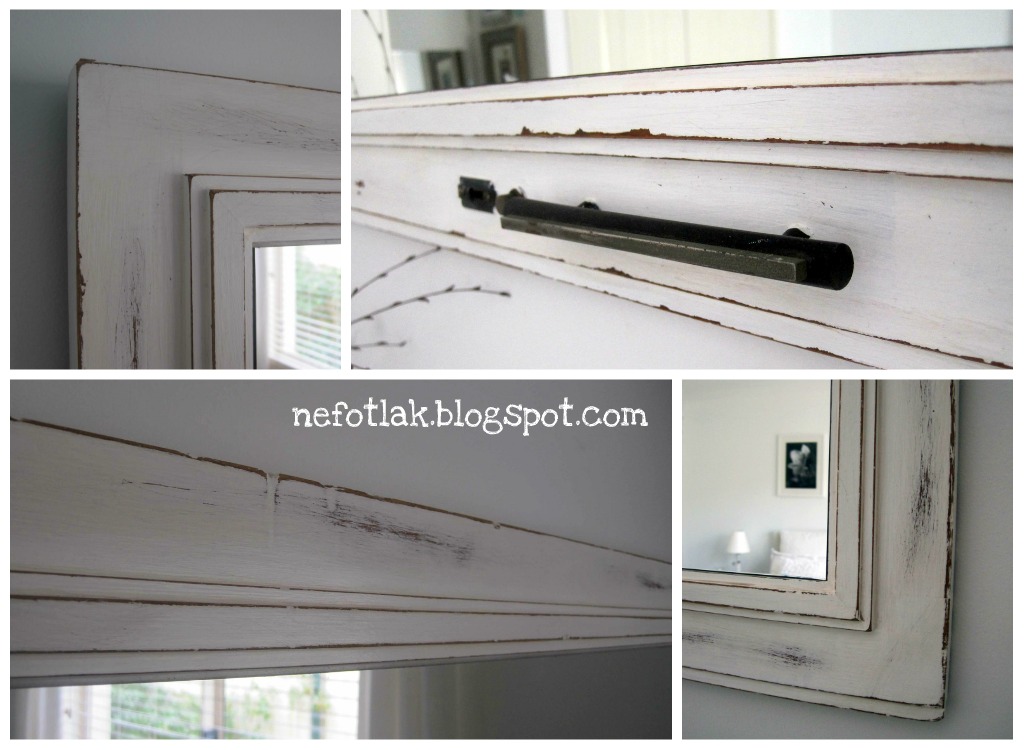
today's post is about an upcycled cabinet door - which has been turned into a wall mirror.....


it used to look like this.....


fyi - the cabinet this belonged to is in our bedroom. (we got it for free when we did a cabinet swap with our neighbours!!) under the doors lay loads of flush fit big heavy drawers. it was super frustrating to open the doors and then open the drawers to get to things - so one morning i declared that they had to come off!! the whole cabinet will be re-painted when we get a chance to get to our bedroom! and the other door may be upcycled to a chalkboard in the very near future.

no progress photos of the following process (bad blogger i know...) - but here's my method -

- after wiping down (no sanding - i'm too lazy!!) - i painted on 2 coats of zinsser bulls eye 1-2-3 (undercoat/primer-sealer/stain killer) - love this stuff - and 2 coats of dulux aquanamel semi gloss fair bianca half strength. (both were bought from bunnings)

- i then sanded it back heavily in spots with our nifty hand sander - and painted on/wiped off a little glaze i made with jo sonja's clear glaze medium & semco acrylic paint in burnt umber. (both bought from spotlight)

- we left all the hardware on the door - 'cuz it reminds us of it's former use - and it looks kinda funky!!!

- we then measured up and got a mirror cut to size from a local glass merchant (after getting about 5 quotes from various places) - then attached the mirror in with heavy duty double sided tape. (mirror cost $50 - which was a bit of a bugger - but it fits perfectly & is covered in a special film on the back which means it won't shatter in a million sharp bits if something bad were to happen)

- on the back of the frame - we added some heavy duty sawtooth frame hangers (see here for what they look like - these aren't the exact brand we used - but ask for sawtooth frame hangers at bunnings and they'll lead you to them!) - and using a spirit level - hung the whole thing up on some hooks.

note: it's not in the exact right spot on the wall - it's level but we didn't centre it as much as i would have liked - when i get around to it - i might fix it up!!

here's lots of pics.....


tissue paper flowers posted about here

this mirror not only reflects loads of light around the room - it also allows goob to have a place to do her hair and makeup - so that she's not taking over the bathroom. (3 girls must share 1 bathroom - and at times it can get pretty crowded in that space!!!)

here's a before and after pic for one last reminder......

and here's one more last pic - 'cuz i can.....


i'll be back tomorrow to post about that jar hanging thingy up there!!

hope you're having a great weekend.

cheryl xox.

Join  us Saturdays at tatertotsandjello.com for the weekend wrap up       party!

Weekend Bloggy Reading

UndertheTableandDreaming

Friday, 9 September 2011

thrifty finds - glass bowls

i dropped into our local salvataion army store to see what i could see - and here's what i found.......


and they were all priced like this.....


yes - that's right - only $1.00 each!!
so i snaffled them up - brought them home and gave them a good clean.....

and now they're all being used in goob's room upgrade doing this.....


here's a peek of goob's dressing table as it sits today.....


yes.....i've been very slack with the updates - but we have been very busy behind the scenes!

drop on by tomorrow for another update - blog posts will be coming thick and fast now that i've finally taken some finished project photos.

hope your friday has been a good one!

cheryl xox.

Thursday, 8 September 2011

some blog changes

call me crazy - but i thought this wee blog needed some more changes!!

i've taken away the flower photo background - and instead used a plain blogger template and added a picture header which i created in piknik.


i've also added a new tab at the top titled diy projects - where i added pictures and links to all my favourite projects so far.

a while ago i also added a tab with the house tour - which i hope to update when i get around to cleaning up a little and taking some photos! (i don't think any room will ever be 'complete' - knowing my a.d.h.d. tendencies!!!)

and finally i also added the little widget that allows people to see other post suggestions at the bottom of the post (go on - scroll down and see the pics and links.....) this was really easy to add with link within. you just type in your blog details and how many posts you wish to have shown - then add it into your page features.
here's a cropped screen shot of what you fill in -

once you fill it in and press on 'get widget!' button - the site then explains how to add it into your blog.

if anyone needs further help with how to add these things - just let me know and i'll add a more detailed step-by-step explanation. more than happy to help.

after looking at and following so many other blogs i just decided to add parts to mine that i always looked for in other blogs - ie - i love house tours, project links and popular post suggestions.

what other things do you like to see on people's blogs??

anyhoo - just thought i'd let you know about the changes here.

best get my butt into gear and share the photos soon of more things i've been up to in goob's room makeover.

hope you're having a great week.

cheryl xox.

Tuesday, 6 September 2011

ikea - usa versus aus prices

this is a definite rant!
and i'm not ashamed to say it.

i have been doing some wee research into some bling for my girls bedrooms - chandeliers and the sort.

ikea is inexpensive (albeit a wee hike from canberra - but i've been known to do a few road trips to get me some ikea love!!)- so i figured i'd check out what they had.

here's the kristaller ceiling fixture shown on the australian ikea website.....

web link here
not a bad price australian-wise - i've been checking around and it's hard to get some bling for much cheaper.
not looking for something too fancy - just something a bit more special than a globe!!

however - i saw someone pin this same chandy on pinterest with a very low price attached and thought i'd check out the ikea usa website to see what was going on.......

web link here

yeah - you read that right - less than half the price of the australian version.

yes we are 'way down here' - miles and miles away - and we're on a different power supply from the usa - but tell me dear readers....(if there is anyone out there....).... why do we have to pay more than twice the amount than our american friends to the north - and our dollar is higher than ever???????????

really cranky right now.

nuff said.

cheryl xox.
(kisses and hugz for everyone apart from ikea....)

Thursday, 1 September 2011

lounge room - floor lamp upgrade

happy spring to all my southern hemisphere readers!!
so so so glad that we're seeing the end of that cold winter. my bones need warming.

with the arrival of spring - and some good news received today about goob (she's been selected in an under 17's rep canberra netball team for the upcoming state league games - woot from this proud mumma!!!!!) - i got my ass out from behind the computer and actually did some house stuff!!

behold our loungeroom floor lamp after months of tweaking with it........


it used to look like this..... (not great actual lamp photos - but hopefully you'll get the idea).....


lamp and shade originally from freedom many many moons ago!! i was bored with it and needed a zero/low cost makeover.

details on the shade.....

i ripped some strips from some white fabric i had in my stash - cutting a little notch in the side of the fabric and ripping straight across - then i tied the strips straight onto the shade (no glue - no sewing - easy!!!!!!)

here's some photos of the transformation.....it was one evening - and i just kept ripping strips and tying them on.....


originally i had planned to have the ties at the back - but i then turned it around and liked the effect of all the messy ties - they became the feature!!


i then added on two black strips for some fun - but as i'm one of those annoying people with perhaps some undiagnosed adhd - i decided to remove the black today - but here's how it looked yesterday!!!


here's some closeups of the shade.....


and here's a peek on the inside to show that the ties do bend the shade in slightly where the knots are - but from the outside you really can't see it.....


so that's the shade.....


now... details on the base

we had the wire already  - bless my husband for keeping absolutely everything!!!
i don't have actual photos of the making of the wire base - as i was alone and struggling to tame the wire without taking out an eye - note: do this with help if you are thinking of doing something similar!!

here's one arm after this diy event.....


there was only the wire involved - no glue - no re-wiring of the lamp - just rolling it up as tight as i could (by myself) - then twisting some of the wire ends to hold it together.....


close-up of one of the twisted ends.....


to put it in place - i took off the shade - then just 'threaded' it onto the base - it just sits in place.....


so that's our new/old lamp.......i am loving the changes.... here it is this evening all lit up......i've been staring at it all evening (i love it when a plan finally comes together!!).....

 
maybe there could be some ceiling fixtures in a similar fashion with the wire.....mmmm - i'm thinking!!!

to show you how my brain works.......for over a month now this lamp had the shade done - but i was messing about with some ideas for the base - including some toilet rolls and cardboard cut outs.....

but it wasn't working for me - and today i just had to change it up one last time.


and apart from that - i've also been painting some furniture......but more on that another day.

hope your day has been productive - or at the very least pleasant!!
thanks for dropping in.

hugz from here.
cheryl xox.

linking up with.....

36th Avenue


Join  us Saturdays at tatertotsandjello.com for the weekend wrap 
 up           party!

UndertheTableandDreaming

The DIY Show Off


Related Posts Plugin for WordPress, Blogger...